| Direct flash (on camera) produces a flat photo with shadows directly behind the subject. Try shooting up higher or at the side more. If the flash is held above, it gives more of a 3D effect (hold slightly off center also). | With
the bounce flash, the effective distance is between you and the ceiling
and the subject. Figure the angle of bounced flash not to end up in front
or back of subject but on it. A way to get rid of sunken eyes and lost shadows when using bounce flash is to put an index card on the flash. |
| Bounce flash needs more light and/or increase the aperture size ie... from f11 to f8 which will let in more light. | Use a flash outdoors to avoid “sunken or hollow eyes” when photographing in the shade. Outdoor fill flash also increases the quality of shadows. |
| To help avoid “red eye” turn all the lights on in a room when using flash. Select a camera with the flash as far away from the lens as possible.. | Don’t bother using flash over 30 feet away. Most non professional flashes are worthless at this distance or greater. |
| There are limitations with fill flash because of flash power. If the sun is bright, it provides dark shadows-determine the correct exposure then put your flash not to overpower but fill in “give light and quality to” shadows. If correct exposure is 1/125 @ F5.6 set your camera at this exposure but set your flash to flash at 4.0 or 2.8. This provides less light entering the shutter from the flash so the sun is complimented not overpowered. (1.5 to 2 stops under for flash. If you can’t set your flash manually then turn the power down on the flash. Always set flash for a wider (smaller number) F stop than you are shooting at. | Avoid photographing
people with the sun at their backs. If you must photograph this way then
use a flash, even in the day or you won’t see the faces of the people. Strong side lighting give good texture. Use flash to the side of the object being photographed in order to capture texture on it (remote flash or strobes). |
| Direct lighting (on
camera flash) is harsh. Diffused lighting (off camera, or bounce flash) is softer. |
In backlight situations (light coming from the back) if it says to shoot at F8, shoot instead at f11 to see more of the subject and not be overpowered by the sunlight. |
| A polarizing lens only works at 49º to 90º. It does not work on front or back of an object, only the side (light coming from an angle). | A large light source makes softer shadows, that is why professionals use umbrellas to soften their light. |
| Don’t use light to the side on older people. Use side lights for people with long noses and not for people with short chins or noses. If they have a short nose and chin, make your camera shooting angle higher to elongate them slightly. |
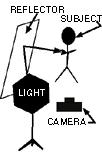
To make artificial window light, bounce or aim your flash at a reflector (large white panel) be sure the light isn’t too bright as it falls on the subject. |
| When using window light, use a window on the opposite side of where the sun is. If you can look out the window and see the sun, go to the opposite side of the room. This provides a very soft, romantic feel to the photo! The closer a subject is to the camera, the harsher the photo will be. Window lighting doesn’t show marks on the face as much as with flash. |
Window lighting usually requires much slower speeds, usually F4 @ 1/30. Use a tripod to control camera shake. Use a reflector to fill in the shadows. But, be sure the reflector is not too big or too close to the subject or you will destroy the window light effect. The reflector often also puts a “catch” light or sparkle in the subjects eyes. Have the subject lean toward the window (light source) for more light. |


