
|
Your subject should not look directly at the lens but slightly off from it for a more pleasing natural photograph. Remember, expression makes for better photographs.
|
 |
When a subject has glasses, turn them more toward you. Try lifting up the back of the glasses slightly to change the angle of the lens and help avoid light reflections in them. Raise the lights higher to avoid reflections. | ||||||
| Using a stool or bench will make a person sit up straighter, in a chair, people tend to slouch. If they are still slouching, tell them to “Arch your back” rather than say “Sit up straight.” Then show them. |
When photographing people
in rooms, place them away from the walls. This will help eliminate harsh
shadows behind them when using flash.
|
 |
||||||
| Watch the background behind people to make sure nothing is “growing” out of their head. Also, watch the background because complex background detract from the actual subject. Keep it simple unless you are doing an environmental photograph. |
 |
You don’t always have to photograph from the front. Often a 3/4 or side view photograph is more interesting. | ||||||
| Get close! A person’s personality is in the face--photograph them from the waist up. Pictures showing the full body make the face very small and usually look awkward. Take a few full body shots then the majority closer up. | Avoid always putting subjects always in the center of the photograph. Shift them right or left or/and up and down. Try shooting sideways (vertical portrait) on some of your photos for variety. | |||||||
| If a persons hair is messed up, ask them “Is your hair the way you want it.” They will usually adjust their hair without being offended. | Make sure the subjects relax and feel comfortable. For people who don’t like to be photographed, put something between the camera and subject ie...a chair or stool, (not in the photo), it creates an area of safety and often will relax them plus it “provides protection”. | |||||||
| Overlap subjects rather than separating them. Try not to have eyes across from eyes by placing the subjects at different levels. |
 |
Seat the taller person in a group and have the shorter person standing spread their legs to make them shorter and to make the heads closer together if necessary. | ||||||
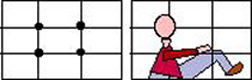 |
Use the ‘Rule of Thirds’
(used since the Renaissance). Place main part of subject on one of the
dots and the photo becomes attractive to the eye. However, don’t
force a subject to fit the rule of thirds if it won’t work for it.
If centering a subject, place the eyes on the top 1/3 line.
|
When posing groups, start from the center of a group and put the most important person(s) in the center and build the group around them. Have the people twist their bodies sideways slightly to get more people in the picture. Tell them it makes them look thinner (which it does) and you will have no problem. Keep heavy-set people away from the ends of the group as the outside areas of the frame will make them look heavier. In a very large group where you really can’t pose the majority of the people, tell them “If you can’t see my camera, your face will not be in the photo” so they will adjust their position. | ||||||
| Clothing: Yellow is not a good compliment color to skin tones. Green and blue work best for people and create more natural photographs. Use jewelry in photos as it enhances the subject. Jewelry and hair photograph very well. Blondes are more photogenic as they show up better on film and the eye tends to focus on the lighter parts of a photo first. With this in mind, have people wear something a tone or two darker than their skin tone (squint eyes to see the difference in tones). Remember, the eye is attracted to lighter objects. |
||||||||
|
|
||||||||
 |
||||||||